 Save Pin
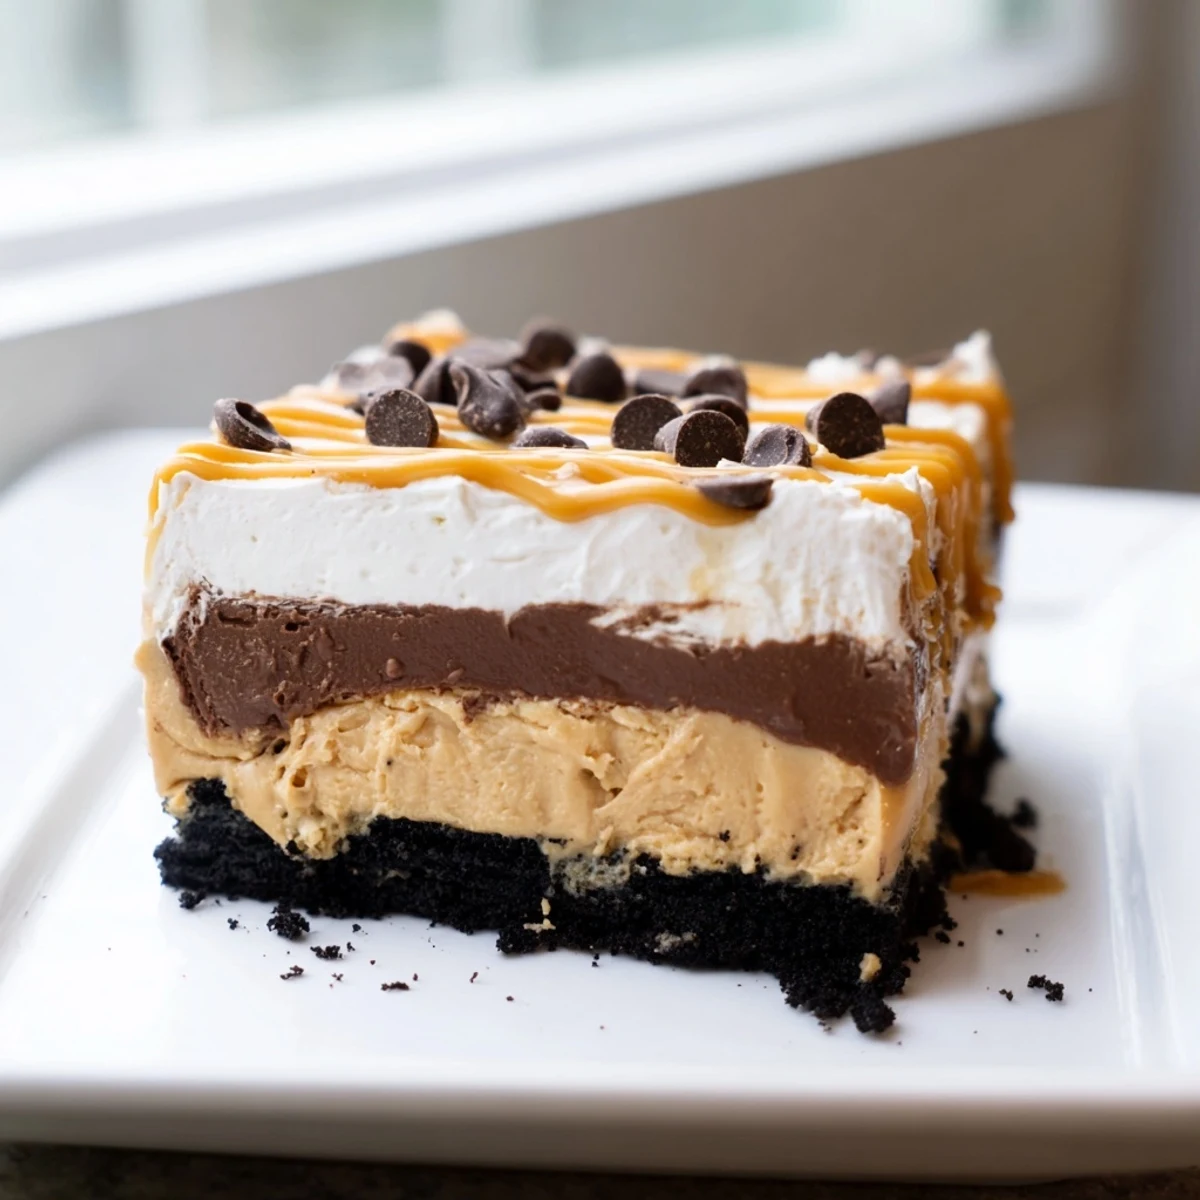
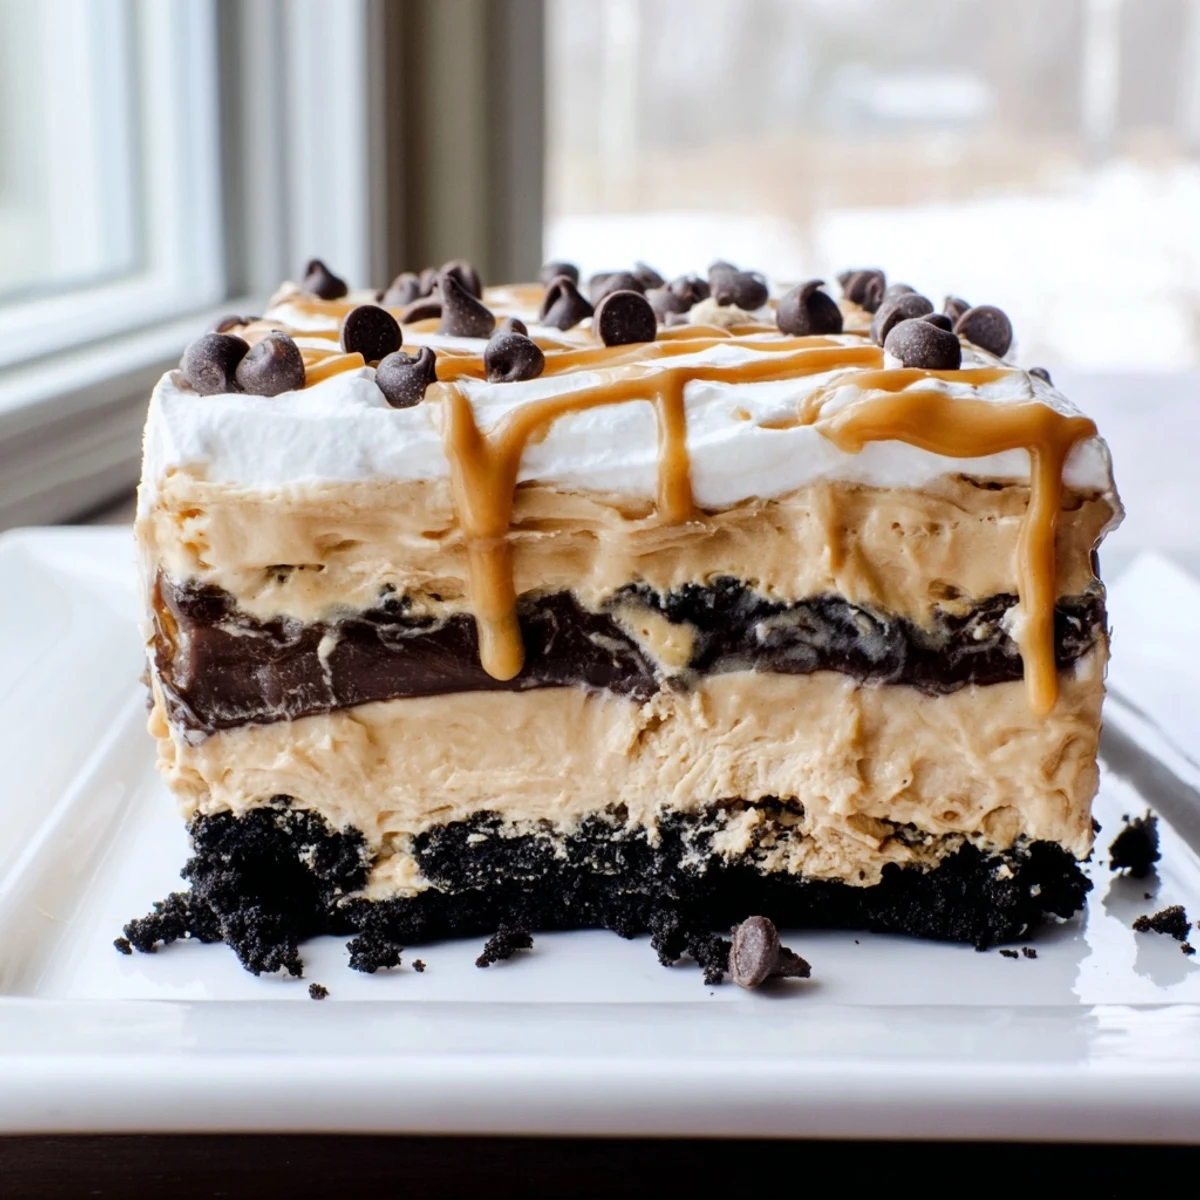
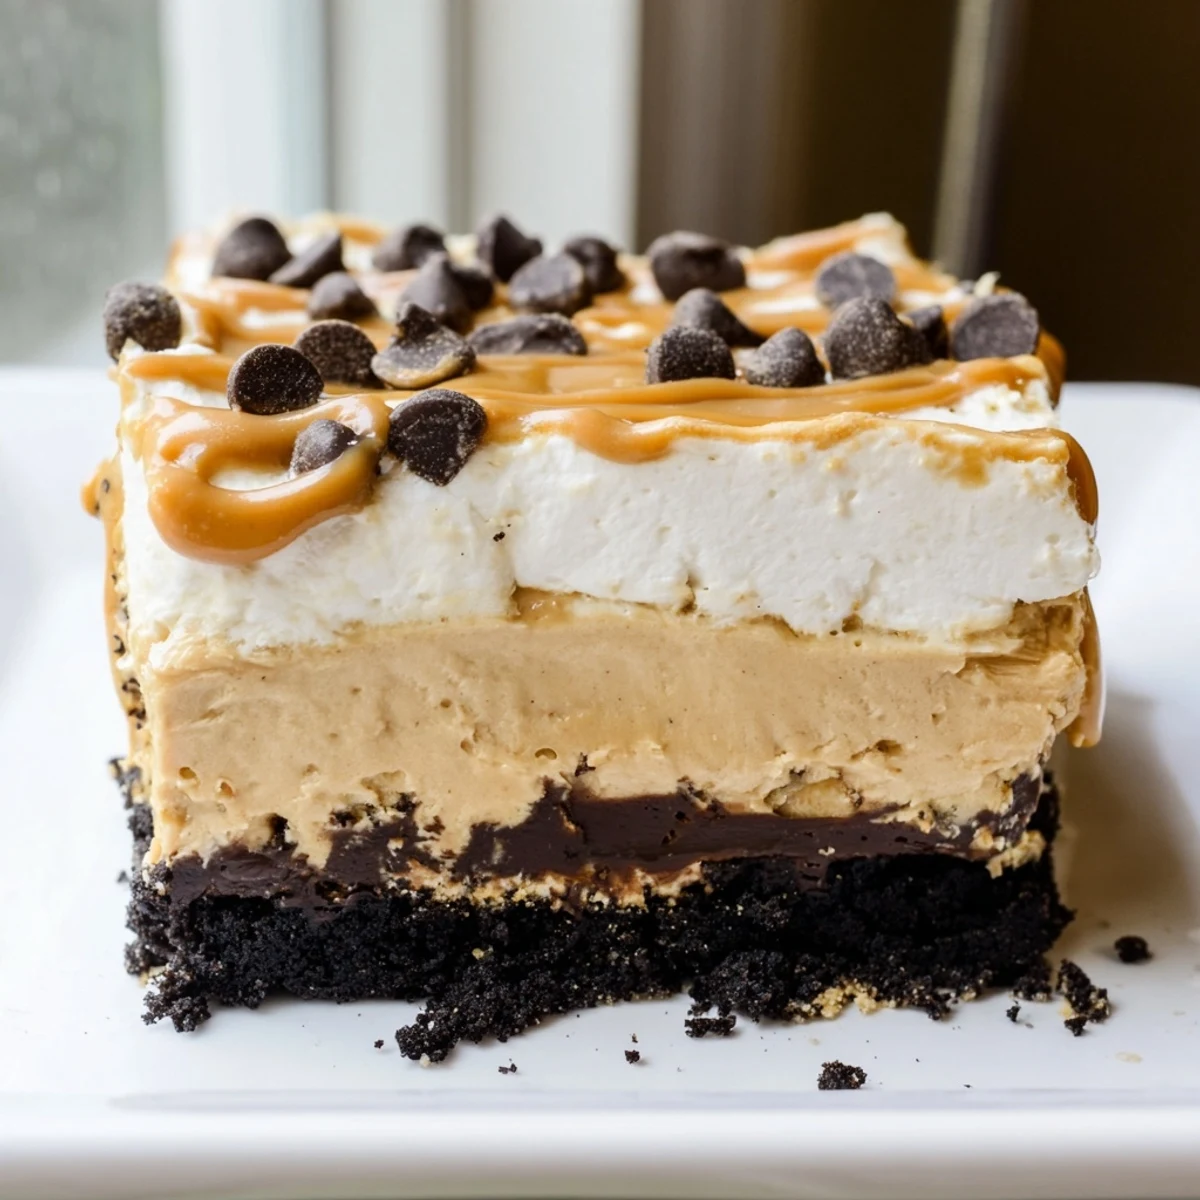
 This no-bake layered delight is a dream come true for peanut butter enthusiasts. Starting with a buttery chocolate cookie crust, each layer builds upon the last with velvety cream cheese and peanut butter filling, rich chocolate pudding, and a fluffy whipped topping to finish.
Requiring just 25 minutes of hands-on preparation and a 3-hour chill in the refrigerator, this dessert is as effortless as it is impressive. The contrasting textures of the crunchy crust against the creamy layers create a satisfying bite every time.
Customize with drizzled peanut butter, chocolate shavings, or chopped peanuts for extra flair. Serve chilled at your next gathering and watch it disappear.
The screen door slammed shut behind my neighbor Karen as she walked into my kitchen carrying a half empty jar of peanut butter and a look of desperation. Her sister was visiting in two hours and she had promised a show stopping dessert. I rummaged through my pantry, found a sleeve of chocolate sandwich cookies, and decided layers were the answer. What we assembled in that frantic twenty five minutes became the most requested potluck contribution in our neighborhood for the next three years.
My friend Marco once stood in front of the fridge at midnight, fork in hand, eating the leftovers straight from the dish while his wife slept upstairs. He texted me a blurry photo the next morning with the caption never making this again, too dangerous. He made it again the following weekend for his book club.
Ingredients
- 200 g chocolate sandwich cookies, crushed: The darker the cookie, the better the crust holds together and the more dramatic the contrast against the pale layers above.
- 75 g unsalted butter, melted: This binds the crumbs into something that actually slices cleanly instead of crumbling into chaos.
- 225 g cream cheese, softened: Let it sit on the counter for at least thirty minutes or you will fight lumps the entire time.
- 120 g creamy peanut butter: Use the standard commercial kind here, not the natural stirring kind, because the stabilizers help the layer set properly.
- 100 g powdered sugar: It dissolves invisibly into the cream cheese mixture where granulated sugar would leave gritty surprises.
- 240 ml whipped topping for the peanut butter layer: Folding this in gently is what transforms dense peanut butter into something cloud light.
- 1 package instant chocolate pudding mix (100 g): Instant, not cook and serve, because this dessert never sees a stove.
- 375 ml cold milk: Whole milk gives the pudding layer a richer taste, but any milk you have on hand will work.
- 240 ml whipped topping for the top layer: This final blanket seals everything underneath and gives you a canvas for drizzling.
- 2 tbsp peanut butter, melted (optional): A drizzle of this across the white topping makes people think you tried much harder than you actually did.
- Chocolate shavings or mini chips (optional): Purely for visual drama and a little texture on each forkful.
Instructions
- Build the crust foundation:
- Crush the cookies into fine crumbs, either by bashing them in a zip top bag with a rolling pin or pulsing in a food processor. Mix with the melted butter until the crumbs feel like wet sand, then press firmly and evenly into the bottom of a 23x23 cm baking dish. Pop it in the fridge to firm up while you move on.
- Whip up the peanut butter layer:
- Beat the softened cream cheese, peanut butter, and powdered sugar together until completely smooth with no pale streaks remaining. Gently fold in the whipped topping using a spatula, sweeping from the bottom to keep the air in. Spread this fluffy mixture over the chilled crust, smoothing the top as evenly as you can.
- Create the chocolate pudding layer:
- Whisk the pudding mix and cold milk together for about two minutes until it thickens noticeably and coats the back of a spoon. Pour it over the peanut butter layer and spread gently so you do not disturb what is underneath.
- Crown it and chill:
- Spread the remaining whipped topping over the pudding in even swoops. Drizzle with melted peanut butter and scatter chocolate shavings or chips if you are feeling fancy. Cover tightly and refrigerate for at least three hours until every layer is set and sliceable.
 Save Pin
 The night my daughter turned eight, she blew out the candles on a version of this dessert because she had begged for something with peanut butter instead of traditional cake. The guests, a herd of sugar charged second graders, went silent after the first bite. That kind of hush is the highest compliment a dessert can receive.
Smart Swaps and Variations
Gluten free chocolate sandwich cookies work beautifully for the crust if you need to accommodate dietary restrictions without making a big announcement about it. I have also pressed chopped roasted peanuts between the peanut butter and pudding layers when I wanted a surprise crunch that caught people off guard in the best way.
Tools You Will Want Handy
A 23x23 cm baking dish is the ideal size, but I have used a similar rectangular dish in a pinch and simply adjusted the layer thickness. An electric hand mixer makes short work of the cream cheese mixture, though a sturdy whisk and some determination will get you there too.
Storing and Serving Like a Pro
This dessert actually tastes better on the second day when the flavors have had time to mingle and the crust has settled into something even more cohesive. Cover the dish tightly with plastic wrap or transfer individual squares to an airtight container and keep them refrigerated for up to four days.
- Freeze individual squares on a parchment lined tray, then store in a freezer bag for up to one month for an ice cream like treat.
- Let frozen squares sit at room temperature for about ten minutes before eating so the layers soften just enough.
- Always keep this chilled until the moment you serve it, because warmth is the enemy of those distinct beautiful layers.
 Save Pin
 Some desserts demand precision and fancy techniques, but this one asks only for a few bowls, a bit of patience while it chills, and people who appreciate the magical combination of peanut butter and chocolate. That last part will never be a problem.
Recipe FAQs
- → Can I make this dessert ahead of time?
-
Absolutely. In fact, this layered delight benefits from being made a day in advance. The extra chilling time allows the flavors to meld together and the layers to set firmly. Simply cover tightly with plastic wrap and keep refrigerated until ready to serve.
- → What can I substitute for whipped topping?
-
You can use homemade whipped cream as a delicious substitute. Whip 240 ml of heavy cream with 2 tablespoons of powdered sugar and a splash of vanilla extract until stiff peaks form. Keep in mind that homemade whipped cream is slightly less stable than commercial whipped topping, so serve within a day for best results.
- → How should I store leftovers?
-
Cover the baking dish tightly with plastic wrap or transfer individual slices to an airtight container. Store in the refrigerator for up to 4 days. The cookie crust may soften slightly over time, but the flavors will remain delicious.
- → Can I use natural peanut butter instead of commercial creamy peanut butter?
-
Commercial creamy peanut butter works best for this dessert because it has a consistent texture and blends smoothly with the cream cheese. Natural peanut butter tends to separate and can make the layer grainy or oily. If you prefer natural peanut butter, stir it very thoroughly before measuring and consider adding an extra tablespoon of powdered sugar to help bind the mixture.
- → Is there a way to make this gluten-free?
-
Yes, simply swap the chocolate sandwich cookies for a gluten-free variety. Many brands offer gluten-free chocolate sandwich cookies that work perfectly for the crust. Also double-check the pudding mix label, as some varieties may contain gluten-based thickeners.
- → Can I freeze this layered dessert?
-
Freezing is possible but not ideal. The whipped topping and pudding layers can change texture upon thawing, becoming slightly watery. If you do freeze it, wrap individual portions tightly and consume within one month. Thaw overnight in the refrigerator before serving.
